Workflows and Data Objects
Workflows are routinely used to interact with data objects. Workflows may be executed directly from page controls, from JavaScript, or from page events such as a page loading. This topic works through two simple examples with workflows that employ the Data Object node and SQL statements.
Example data object
A data object like this is used in the examples below:

Reading from a data object
Workflow
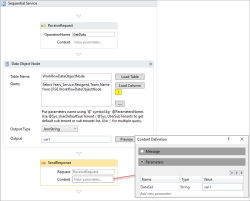
You can use a Data Object Node in a workflow to read a data object using a SQL Select statement. In this case, there are no input parameters, and the output is configured as a JSON string.
Page controls
A button configured on a web app page can be used to run the workflow, and a data list or a grid control can display the data returned.
- Add a data list or grid to the page. In a simple example, no additional configuration is needed.
- Add a button to execute the workflow and get the data.
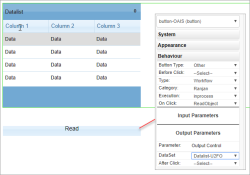
- In the button Behaviour properties:
- Set Type to Workflow.
- Set Category to the workflow category.
- Set On Click to the workflow name.
- In Output Parameters, in the DataSet drop-down list, select the name of the data list or grid control to display the data.
- Save the page.
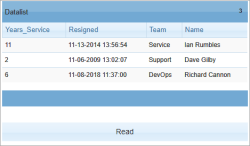
These screenshots show the button configuration in page designer, and the data displayed in the web app page:
The column order displayed by the data list follows the order used in the SQL Select statement.
Execute the workflow automatically
When the page loads, you can execute the workflow automatically to display the data in the data list without using a button.
- Select the page Layout Behaviour properties.
- In the Page Load properties, set Type to Workflow.
- Select the workflow Category, and then select the workflow in On Load.
- Save the page.
Inserting data into a data object
Workflow
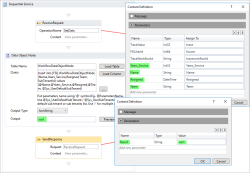
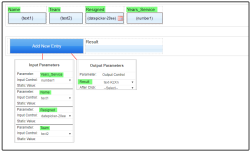
In the data object there are four columns with user data requiring four inputs to the workflow. The workflow output will show the result (success/fail) of the update.
Page controls
- Add the following controls:
- A text box for the Name field.
- A text box for the Team field.
- A date picker for the Resigned field.
- A number box for the Years_Service field.
- A text box to display the result of the insert.
- A button to execute the workflow and add the data.
- In the button Behaviour properties:
- Set Type to Workflow.
- Set Category to the workflow category.
- Set On Click to the workflow name.
- In Input Parameters, you should see parameters for each of the workflow inputs; select the appropriate Input Control for each parameter.
- In Output Parameters, in the Result drop-down list, select the name of the text box control to display the result.
- Save the page.
The screenshot below shows the controls mapping to the button input and output parameters:
